This article mainly introduces volvo Marine engines MD2010A/B/C·MD2020A/B/C·MD2030A/B/C·MD2040A/B/C Fitting and adjustment guide
07.2022 VOLVO Penta EPC Parts Catalog 6 Marine & Industrial Engines
(WARNING! If the crankshaft and camshaft are turned without being synchronised with each other the valves can go against the pistons and be damaged.
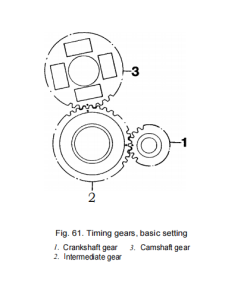
Note: The gears in the timing gears which are of import-
ance for adjustment are marked as follows: Crankshaft gear-the intermediate gear is marked with a punch mark and the intermediate gear-camshaft gear with a circle opposite the tooth and tooth gap
(Fig.61).
2022 Volvo Premium Tech Tool 2.8.150 with Developer Tool
1. Put the key in position in the crankshaft and fit the crankshaft gear.
2. Fit the camshaft complete with regulator weights.
Carry out work steps to item 4 under the heading
“Fitting of camshaft”on page 45.
3. Fit the thrust washer(9, Fig.62) on the intermedi-
ate gear’s shaft joumal. Fit the intermediate gear as per the markings (Fig.61).
NOTE! Do not turn the crankshaft before the timing gear casing is fitted.
4. Grease in the oil pump’s inner rotor(6, Fig 62) and housing(outer rotor,8).
Fit the inner rotor and cover to the oil pump. Fit the shims, spring, spring washer and lock washer as per Fig.62.
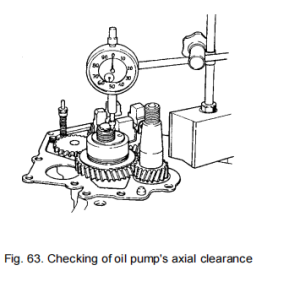
5. Adjust the oil pump’s axial clearance to 0.10-0.15
mm(.0039-.0059 in). Shims are available in sizes
0.10;0.15;0.20and 0.50mm(0039,.0059,.0078
and.0196 in)
Volvo Vodia Penta 2018 [5.2.5] Diagnostic Software
6. Check the crankshaft seal in the timing gear cas-
ing, and replace if necessary. See under heading
“Replacement of front crankshaft seal”on page 40.
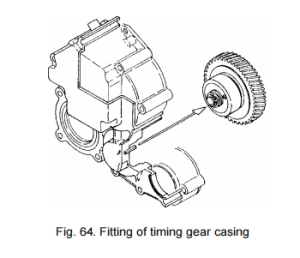
7. Centre the cover in front of the oil pump.
Note: The hole in the cover should be in the posi-tion shown in Fig.64(which it should if the mark-ings on the gear wheel coincide according to Fig.
61).
8. Place the timing gear casing in position with a new gasket. Observe care so that the crankshaft seal is not damaged.
Check that the start spring is in position in the tim-
ing gear casing and is connected to the regulator arm(link arm).
Put in the regulator through the hole in the cylinder block.
Note: Check that the tubular pip in the timing gear casing can engage in the hole in the oil pump cover. Turn the cover backwards and forwards and centre it in mid position.
Volvo Tech Tool Diagnostic Software Training
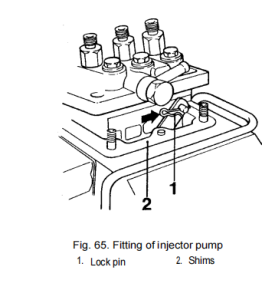
9.Tum the stop lever clockwise and connect the arm to the injection pump.Fit the lock pin.
NOTE! Make sure that the shims which were placed under the injection pump flange are re placed in position before the pump is placed in the cylinder block (applicable where the pumps has been removed).
10. Tighten the timing gear casing and injection pump.
Tightening torque: see Technical data.
11 Check the injection start(crankshaft position) in the event that a new injection pump or complete new camshaft is fitted and if a new cylinder block is used.
Se directions under the heading “Adjustment of in-
jection angle”on pages 55 and 56.
12. Connect the fuel hose to the injection pump.
Fit the delivery pipe.
Tightening torque: see Technical data.
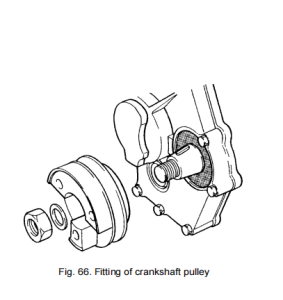
13.Put the key in position in the crankshaft and fit the crankshaft pulley.
Tightening torque:see Technical data.
14. Fit the sea water pump on the timing gear casing.
Connect the water hoses to the pump.
15. Fit the drive belt to the alternator.
Note: If the tension is correct the belt should be able to be pressed in approx.10 mm(.40 in) be-
tween the pulleys.
16. Open the fuel cocks. Bleed the fuel system as per the directions on page 59.
17. Connect the battery leads.